
Turning one podcast into a multilingual show sounds like a studio-sized project, but with the right workflow it takes under an hour of hands-on work per episode once you know the steps. If you have been wondering how to translate a podcast into another language without re-recording every episode, the practical answer is a single localization pipeline that transcribes, translates, re-voices, and syncs your audio. Costs for AI dubbing typically land somewhere between roughly $0.20 and $7 per finished minute, depending on how many minutes and languages you deliver and how much manual quality control you layer in.
We built DubSmart AI around exactly this voice-first work: it takes spoken content from more than 60 source languages and produces dubbed versions across 33 target languages, combining speech-to-text, translation, text-to-speech, and voice cloning in one place. This guide walks through the full sequence, flags the mistakes that quietly ruin dubbed episodes, and shows you where a native reviewer earns their keep.
Table of contents
What you need before you start
A smooth localization run depends less on the tools and more on what you feed them. Get these five things in order before your first project, and every later step gets faster.
- Clean source files. Export each episode as a single WAV or high-bitrate MP3 with minimal background noise, no clipping, and normalized volume. Clean input directly improves transcription accuracy and reduces artifacts during dubbing, especially when speech separation is involved.
- The rights to transform the audio. Confirm you can translate and redistribute spoken content, guest contributions, and any music in every market where you plan to publish.
- A target-language strategy. Decide which languages you are prioritizing and whether each gets a full dubbed feed or only highlight episodes. Every extra language multiplies your minutes and your cost, so plan deliberately rather than dubbing everything at once.
- Voice guidelines. Decide whether the host's voice should be cloned in the new language or replaced with a library voice, and prepare pronunciation notes for product names, people, and technical jargon.
- A funded account. Our platform runs on a credit-based model covering AI Dubbing, Speech to Text, the Speech Separator, and Text to Speech. Check your balance so you can process full episodes rather than stopping halfway through.
If you want a mental model for how transcription, translation, and re-voicing fit together before you touch a project, our explainer on how AI localization works covers the pipeline end to end.
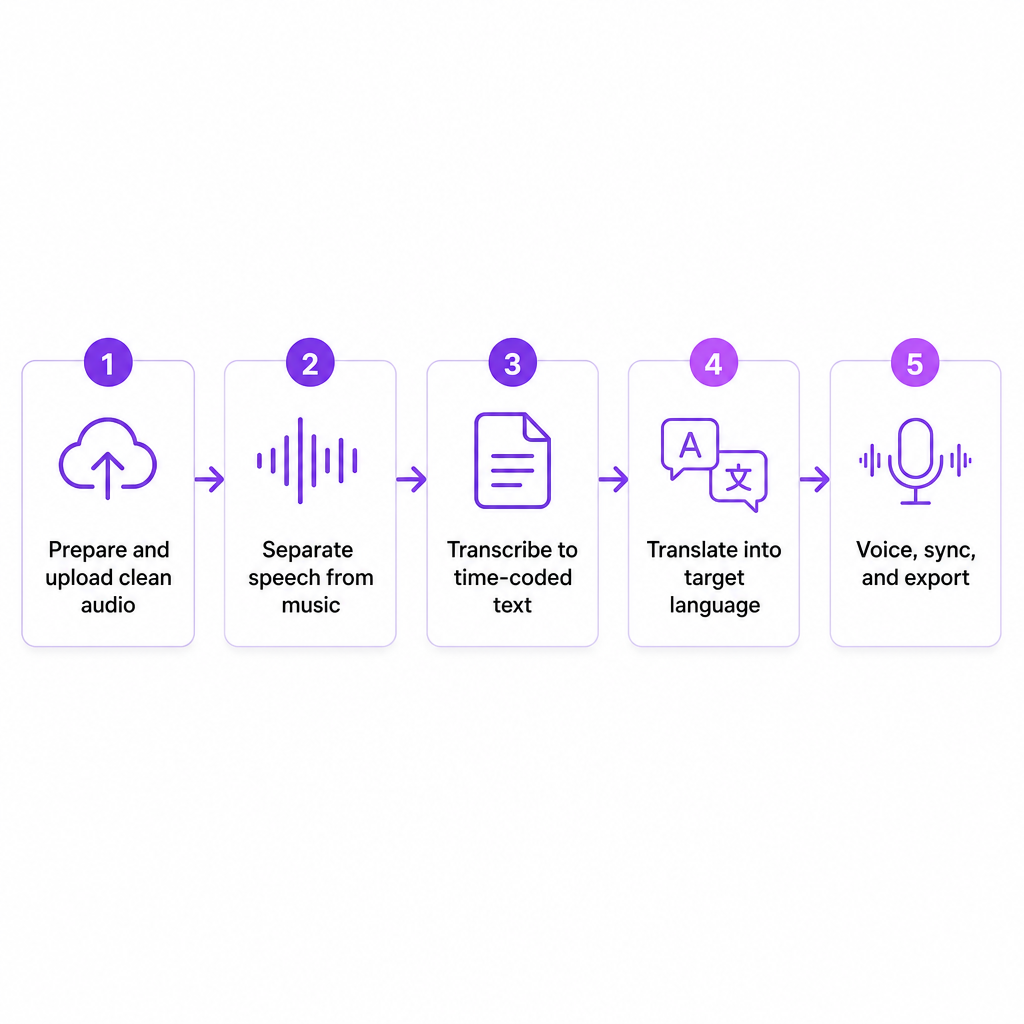
The step-by-step dubbing workflow
This is the practical sequence we use to move an episode from raw audio to a finished, dubbed version. Each step feeds the next, so resist the urge to skip ahead.
Step 1: Choose your localization format
Decide what you are actually shipping. There are three sensible options: fully dubbed episodes with new audio tracks, translated transcripts and subtitles only, or both dubbed audio and translated text. For YouTube and video podcasts, delivering both gives listeners and viewers a version that fits how they consume. Our AI Dubbing tool handles the fully voiced route, while Speech to Text gives you editable transcripts and captions.
Step 2: Prepare and upload the episode
Export the final mix as a single file, then create a new AI Dubbing project from the dashboard. Upload the audio directly, or if the episode already lives on YouTube, paste the link and let the system fetch it. Add the episode title, original language, and any notes about speakers or segments. Correctly identifying the source language matters more than it looks, because it helps the system optimize both transcription and translation accuracy.
Step 3: Separate speech from background audio
Podcasts are rarely dry voice. Intro music, beds, and ambient sound all bleed into the mix, and dubbing over them creates a muddy result. Our Speech Separator isolates dialogue from music and effects so the new voice track sits cleanly on top. Enable the separation step if it is not already on, then play back the isolated speech to confirm voices are clear. If the original mix is extremely noisy, lightly remaster it and re-upload before continuing.
Step 4: Transcribe with Speech to Text
Accurate transcription is the backbone of the whole process. Our Speech to Text tool converts spoken content into time-coded text aligned to the original timeline, which you can view and edit in the project editor. Do three things here: assign speaker labels to the host, co-hosts, and guests; correct misheard words, brand names, and technical terms; and trim filler that adds nothing in translation. This is also the moment to adjust content that may not suit certain markets. Clean transcripts here prevent compounding errors later.
Step 5: Translate into your target language
With a clean transcript, the pipeline translates the time-coded script while keeping context, timing, and intent aligned to the original audio. Select your target languages, then review the machine translation for tone, idioms, and culture-specific references. Jokes and metaphors rarely survive a literal pass, so adjust them here. If a language has regional variants, decide up front whether you are targeting, for example, Latin American or European Spanish, and keep that choice consistent across every episode.
Step 6: Choose voices and generate localized speech
Our Text to Speech engine turns the translated script into lifelike audio from a library of 300+ voices across genders, styles, and languages, and voice cloning can replicate the original host's vocal identity in the new language. For each labeled speaker, pick a voice that matches their age, gender, energy, and brand persona. For solo shows, cloning the host keeps the dubbed episode familiar to existing listeners. Generate the audio inside the dubbing pipeline; the system syncs the new speech to the original timeline, preserving pacing and segment boundaries. Then listen through, re-generate any awkward lines, and swap voices that feel off-brand.
Step 7: Run final quality control and export
Before release, do a full pass. Verify key messages, calls to action, disclaimers, spoken URLs, and social handles are correct and well pronounced. Confirm volume is consistent, music does not overpower speech, and separation left no echo or artifacts. Export in the format and bitrate your host requires. If you produce video episodes and need localized on-screen text or graphics, our Image to Video tool helps update the visuals. Finally, publish each language as its own feed or playlist and label the language clearly in titles and descriptions so listeners subscribe to the right version.
Common mistakes and how to fix them
Most dubbing problems are not exotic. They cluster around a handful of predictable failure points, and each has a straightforward remedy.
- Poor source audio. Noisy, over-compressed, or clipped recordings produce weak transcripts and awkward dubbed audio. Clean and normalize the original mix, use speech separation, and apply light noise reduction in your editor before upload.
- Skipping transcript cleanup. Trusting automatic transcription wholesale introduces errors in names, acronyms, and jargon that then get translated wrong. Always edit the transcript before translation, especially for niche or branded terms.
- Ignoring cultural context. Literal translations of jokes and idioms can sound strange or land badly. Adapt or replace culturally specific references during review, and explain rather than translate word-for-word when needed.
- Inconsistent speaker voicing. Randomly assigned voices make guests and co-hosts blur together. Use speaker labels, fixed voice assignments, and cloning where appropriate to keep a coherent cast across episodes.
- Underestimating quality control. Publishing without a full listen-through leaves timing glitches and mispronunciations in your feed. Do a complete audio QA pass in every language, and bring in a native speaker for critical episodes.
- Overlooking rights. Redistributing translated audio without clearing spoken content, guest contributions, and music can create copyright issues. Confirm rights for every market before you publish.
DIY versus native-speaker review: where to draw the line
Our AI-first workflow is built so most podcasters can translate and dub episodes themselves, without hiring a studio team. For entertainment, commentary, and general-interest shows, and for educational episodes where minor imperfections are acceptable, a solo creator working through the seven steps above can ship polished multilingual episodes on their own. Creator-led shows on YouTube, Spotify, and Apple Podcasts, where reach and speed matter more than broadcast-grade perfection, are a natural fit for the fully self-serve path.
The calculus changes when precision carries real consequences. Bring in professional or native-speaker review when episodes cover legal, medical, financial, or regulatory topics where wording must be exact; when your brand operates in tightly regulated industries or regions with strict advertising rules; or when you are localizing flagship content such as launch announcements, major campaigns, or corporate training where tone and nuance are decisive. Even then, you keep the efficiency: use the platform for transcription, draft translation, voice generation, and timing, then have a reviewer refine the wording and run final QA before you publish.
Frequently Asked Questions
How long does it take to translate and dub a 60-minute episode?
Once you are comfortable with the tools, expect under an hour of hands-on time per episode, plus automated processing time for transcription, translation, and voice generation.
What does it cost to translate a podcast with AI dubbing?
Practical AI dubbing pricing typically ranges from about $0.20 to $7 per finished minute, depending on how many minutes you process, how many languages you deliver, and how much quality control you add. Our platform uses credits, so your effective per-minute cost depends on your plan and usage. Our breakdown of AI dubbing cost per minute walks through the drivers.
Can I keep my original host's voice in the new language?
Yes. Text to Speech and voice cloning work together so you can preserve the host's vocal identity while re-voicing episodes in other languages.
Can I translate only part of an episode?
You can dub an entire episode or only selected segments, such as the intro and outro. Managing this in the project editor lets you focus on the sections that matter most for multilingual branding.
Do I need a separate feed for each language?
Maintaining distinct language feeds or playlists is best practice, so listeners can subscribe to the version they prefer across podcast apps and YouTube.