
A clean transcript from a 30-minute podcast or training video is realistic in under 10 minutes with DubSmart AI, and most creators handle it for between $0 and roughly $20–$50 per month depending on volume. If you want to know how to transcribe audio to text without stitching together a separate transcription app, a noise cleaner, and a caption editor, our Speech to Text engine runs the full job in one workspace: upload media, generate text with accuracy above 95% on clear audio, edit speaker labels and punctuation, then export a transcript or subtitles ready to publish.
The real advantage here is not just speed. Because transcription, audio cleanup, dubbing, and voiceover share the same credit pool, the same transcript you create today can feed AI Dubbing into 33 target languages or Text to Speech with 300+ voices later. That matters if you run a YouTube channel, build e-learning courses, or localize corporate training.
Table of contents
What you need before you start
Transcription quality is decided before you press a single button. Run through this checklist first:
- A DubSmart account with access to Speech to Text and Speech Separator on the Free, Starter, or a higher plan.
- Your source files ready to go: podcast episodes, webinars, interviews, or a YouTube link.
- Rights and permission to transcribe the content, which matters most for client work and third-party recordings.
- A clear target output in mind: a full transcript (DOC/TXT), subtitles (SRT/VTT), or a script for dubbing and voiceover.
- Basic facts about the recording: source language, number of speakers, and whether there is music or heavy background noise.
- For regulated teams, your internal guidelines on handling personal or sensitive data in cloud tools.
Knowing your output format up front saves a round trip. A blog show-notes job wants plain text; a YouTube upload wants timed captions; a localization job wants a clean script you can push straight into dubbing.
Step by step: transcribe audio to text with DubSmart
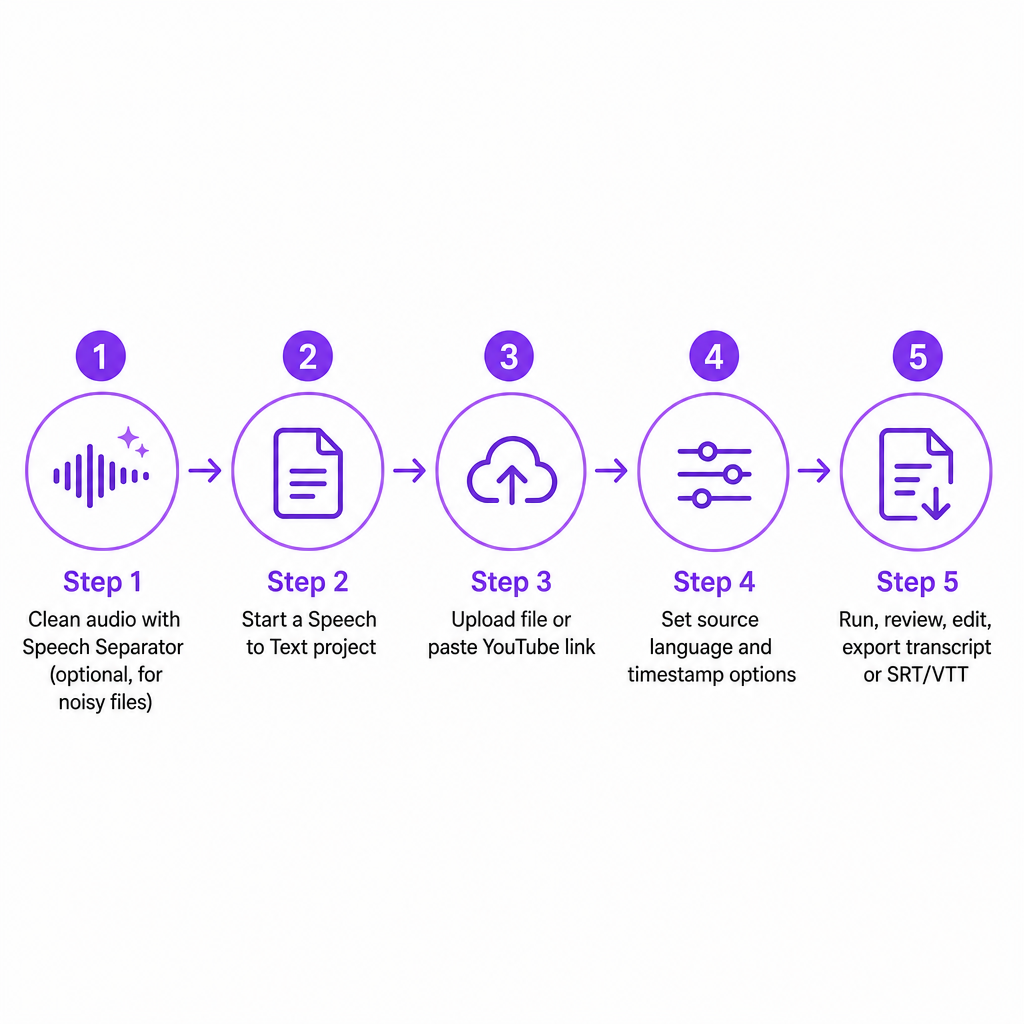
1. Pick the right tools for the recording
Speech to Text converts spoken audio into written text, and it works alongside Speech Separator for noisy recordings. Credits are shared across AI Dubbing, Text to Speech, Voice Cloning, Speech to Text, and Speech Separator, so every minute you process draws from the same pool.
The decision is simple. If the recording has music, crowd noise, or room echo, start with Speech Separator to isolate the voices. If the audio is already clean, skip straight to transcription.
2. Clean the audio with Speech Separator (recommended)
High-quality input is the single biggest factor in accurate automated transcription, especially for multi-speaker podcasts, interviews, and panels. Speech Separator isolates speech from music and background noise in common formats like MP3, WAV, and AAC, leaving a cleaner vocal track.
- Open the Speech Separator tool in your account.
- Upload your audio or video from your device, or select it from your projects.
- Let the AI split voice from background; this usually finishes in seconds to minutes depending on length.
- Save the clean voice file to your project library.
With that cleaned track in hand, the transcription stage produces fewer errors and needs less manual correction.
3. Start a new Speech to Text project
The flow is deliberately short: select the feature, upload media, edit, export.
- Log in and open the workspace dashboard.
- Choose Speech to Text from the tool list.
- Create a new project and give it a descriptive name, such as "Product webinar – October."
Naming projects keeps transcripts organized and makes them easy to reuse for captioning, dubbing, or text-to-speech later.
4. Upload your audio or video
You can upload files directly or pull from a YouTube URL, which is handy for creators and agencies managing client channels.
- Upload audio or video from your device in standard formats like MP3, WAV, and MP4.
- Paste a YouTube URL to bring the video straight into the project, including 1080p uploads where supported.
DubSmart then analyzes the file, extracts the audio, and prepares it for recognition.
5. Set the language and recognition options
Speech to Text supports 60+ languages including English, Spanish, German, Hindi, Turkish, Portuguese, Japanese, Russian, Chinese, and Arabic. Setting the correct source language is not optional detail; the engine relies on language-specific models to decode speech into text.
- Choose the source language that matches the recording. For multilingual content, start with the dominant language.
- If there are multiple speakers, plan to add speaker labels during editing.
- Confirm timestamp and segmentation options if you intend to export SRT or VTT subtitles rather than a plain transcript.
For most single-speaker files, recognition runs at or faster than real time, so processing often finishes within the length of the recording.
6. Run the transcription
Start the process and let the engine work. It segments the audio, identifies phonemes and words, and applies language models to produce text. On clear audio, accuracy reaches above 95%, which sharply cuts your correction workload. While it runs, prepare a short glossary of names, brands, or technical terms you already know you will need to standardize.
7. Review and edit the transcript
Automated output is fast, but professional-grade text still needs a human pass, especially for names, acronyms, and jargon. Edit directly inside the project editor:
- Read through while listening to key sections to catch misheard words.
- Add speaker labels such as Host, Guest, or Instructor so dialogue is easy to follow.
- Fix punctuation and capitalization, which affect both readability and caption timing.
- Standardize terminology, like product names, medical terms, or legal phrases, against your brand or compliance glossary.
Because the same transcript can later feed AI Dubbing into 33+ languages and Text to Speech with 300+ voices, a careful edit now pays off every time you repurpose the content.
8. Export text or subtitles
When the edits look right, export in the format your use case needs:
- Subtitles (SRT or VTT) for YouTube, LMS platforms, and corporate video portals.
- Plain text (TXT) or document formats for blogs, show notes, training manuals, and meeting minutes.
Pick the format, then download or save the finished project. That completes the core workflow for how to transcribe audio to text in DubSmart.
Time and cost: what to expect
DubSmart runs on a credit-based system that applies across AI Dubbing, Text to Speech, Voice Cloning, Speech to Text, and Speech Separator. Credits are interchangeable, so one pool covers transcription minutes, audio cleaning, and dubbing. From our published pricing:
| Plan | Monthly price | Monthly credits | Notes |
|---|---|---|---|
| Free | $0 | 2,000 | About 2 minutes of AI Dubbing/TTS to test the workflow |
| Starter | ~$20 | 50,000 | About 50 minutes of AI Dubbing/TTS; unused credits roll over |
| Standard | ~$50 | 150,000 | Higher volume with a lower per-1,000-credit cost |
Because credits span transcription, voice cleanup, and dubbing, you can treat the whole pipeline as one budget instead of separate tools. For most creators that means transcribing dozens of short videos a month on Starter-tier pricing while keeping credit capacity free for dubbing and voiceovers.
Common mistakes and how to fix them
Using noisy audio without cleaning it. Background music, crowd noise, or echo cause misrecognitions and extra editing. Run the file through Speech Separator first, then transcribe the isolated voice track for higher accuracy and cleaner subtitle timing.
Selecting the wrong source language. If you leave it on English when the audio is Spanish, the engine misinterprets phonemes and produces unusable text. Double-check the language before you start, and for multilingual videos, segment by language or prioritize the main language for the first pass.
Ignoring speaker labels. Multi-speaker podcasts and panels are hard to read without attribution. Add labels like Host, Guest 1, or name-based tags during editing, and keep them consistent across episodes.
Skipping human review for high-stakes content. For legal, medical, or compliance-sensitive material, a small error can change meaning. Treat the automated transcript as a first draft and run full human validation, pairing it with in-house reviewers or external compliance checks where needed.
Misestimating credits. Running a large back catalog without understanding usage can drain your quota. Check your plan's monthly credits and rollover policy first, then run a small pilot batch to measure minutes-per-credit across Speech Separator and Speech to Text before you commit to bulk work.
DIY vs professional help: where to draw the line
DubSmart is built for self-serve use by creators, small businesses, e-learning teams, and agencies who want scalable multilingual content without juggling vendors. Browser-based tools, a free tier, and a shared credit model let most users handle transcription, cleanup, and dubbing themselves.
Self-serve is usually enough when:
- You transcribe episodic content like podcasts, YouTube videos, product demos, or internal training.
- Audio is reasonably clean or can be improved with Speech Separator.
- Accuracy needs to be high but is not legally binding, such as accessibility captions, course materials, or marketing collateral.
- Your monthly volume fits inside your available credits with room left for dubbing or voiceovers.
Lean toward professional or enterprise-level support when:
- You manage large catalogs, hundreds of hours, that need consistent QA, style, and terminology across regions.
- Your content falls under strict legal or regulatory standards, like court proceedings, medical documentation, or financial disclosures.
- You need to integrate our AI Dubbing API or Text to Speech API into complex workflows with uptime and throughput requirements for clients.
In those cases, pairing our automation with professional linguistic or compliance review gives you the best balance of speed, cost, and risk. For most everyday transcription, the self-serve path is faster and cheaper, and it keeps your transcript ready to become subtitles, dubs, or voiceovers whenever you need them.
Frequently asked questions
What types of content can DubSmart transcribe?
Speech to Text handles podcasts, YouTube videos, webinars, interviews, films, and corporate training, as long as the audio is available through upload or a link.
Which languages are supported for transcription?
Speech to Text supports 60+ languages, including English, Spanish, German, Hindi, Turkish, Portuguese, Japanese, Russian, Chinese, and Arabic, and the same platform dubs into 33 target languages.
How accurate is DubSmart's Speech to Text?
On clear audio with the correct language selected, accuracy reaches above 95%, in line with modern automatic speech recognition.
How much does it cost to transcribe with DubSmart?
Pricing starts at $0/month with a free tier of 2,000 credits. Paid plans such as Starter (around $20/month) and Standard (around $50/month) add credits and lower the per-credit cost, and credits are shared across transcription, dubbing, and related tools.
Can I use the transcript for dubbing and voiceovers?
Yes. Speech to Text output can feed directly into AI Dubbing and Text to Speech to produce multilingual dubbed versions and AI voiceovers using 300+ natural-sounding voices.