You can usually reduce or remove background music from a recording in just a few minutes, and the full answer to how to remove background music from audio comes down to one tool choice: an AI speech separator that estimates which sounds belong to the voice and which belong to the music, then splits them into separate tracks. Results are strongest when the voice is clear and the music sits quietly underneath. When the song and the speech overlap heavily on the same frequencies, expect some artifacts to remain. On our platform, Speech Separator is listed at 100 credits per minute, and the free tier includes 2,000 credits—about 20 minutes of separation at that rate. Prices and plans can change, so check our current pricing before you start a longer job.
Table of contents
What you need before you start
Separation goes faster and cleaner when a few things are in place first. None of these are optional if you care about the final result.
- The source file. Speech Separator supports common formats including MP3, WAV, and AAC, and it accepts video files too.
- An untouched backup. Keep the original file exactly as it is. Every fix below assumes you can go back to it.
- Enough credits for the duration. At 100 credits per minute, a five-minute clip costs about 500 credits. Budget for a reprocess or two.
- Headphones or monitors. Laptop speakers hide the watery, metallic artifacts that separation can introduce.
- The right to edit the recording. Removing music from a file is a technical step, not a licensing one. We cover that distinction at the end.
Separate the music from the voice, step by step
The mechanism matters here: a speech separator does not "turn the music down." It rebuilds a voice-only track by predicting which parts of the signal are speech. That is why gentle settings often sound more natural than aggressive ones.
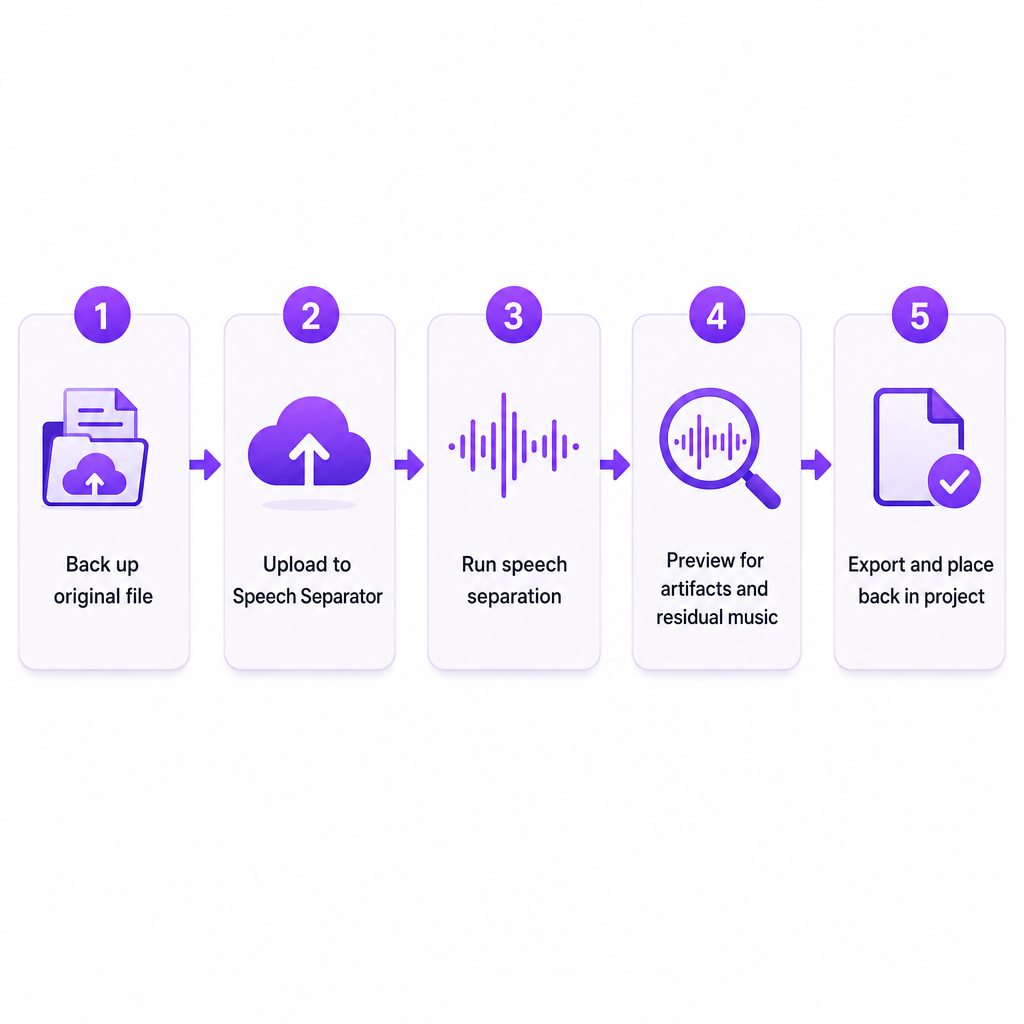
- Open Speech Separator. The tool is built to extract clear vocals from an audio or video file.
- Upload your recording. Point it at the source file, not a re-exported copy. If you can choose a working format, WAV preserves more detail for later editing while you keep the original as backup.
- Choose the speech separation option. The goal is to isolate the voice from the music, not to make everything louder. Louder is not cleaner.
- Run the separation. Processing time varies with file length and current demand. For a short clip, give it a few minutes, then judge the export instead of assuming the first pass is final.
- Preview carefully. Listen for missing consonants, a thin or metallic tone, and music still humming under the voice. Check the start, the end, and the loudest-music sections, because those fail first.
- Adjust or reprocess if the voice is damaged. If a strength or mode option is available, a less aggressive setting usually preserves more natural speech, even if a trace of music survives. That trade-off is often the right one.
- Review in context before exporting. If you are cleaning a video, drop the processed voice track back into the project and confirm sync and loudness against the picture.
Our Speech Separator page describes uploading audio or video and extracting vocals, but it does not publish a guaranteed processing time or a single fixed export format. Confirm those details inside the tool before you promise anyone a deadline. If you want to understand what happens under the hood, our explainer on how AI speech separation works walks through the deep-learning pipeline that makes this possible.
When the result is not clean: fixes that actually help
Most disappointing exports come from a handful of predictable causes. Match the symptom to the fix before you reprocess blindly.
- Music still sits under the speech. Separation is hardest when music and voice share frequencies or when the song is loud. Test a calmer section first, or raise the separation strength if the tool offers one.
- The voice sounds thin, garbled, or metallic. The model may be stripping parts of the voice that resemble musical tones. Switch to a gentler setting or a better source file, and avoid reprocessing an already-separated track—that stacks artifacts.
- Some words vanish. Speech buried under loud music may not come back cleanly. Compare against the original, and if accuracy is critical, restore that phrase from another take or re-record it.
- The file will not upload. Confirm the format and size are accepted, then try a supported format such as MP3, WAV, or AAC.
- You only need to clear a YouTube music claim. For an eligible claim, YouTube Studio offers options such as Erase song or Replace song. Those are platform remedies for claimed content, not a promise that every track separates perfectly.
A quick diagnostic rule: if the artifacts are worse than the original problem, stop reprocessing and reach for the decision below.
DIY or hand it to a pro? A clear decision point
DIY separation is a reasonable call for a short creator clip, a voice memo, a draft, or a rough voice track you will edit anyway—any case where a little residual music or minor artifacts is acceptable.
Bring in a professional audio editor, or go back to the original project files, when the stakes or the audio difficulty rise:
- The recording is for a paid campaign, a broadcast, a film, or a client delivery.
- The music is mixed at roughly the same level as the voice.
- The separated voice already carries noticeable artifacts you cannot remove.
There is one shortcut worth knowing. If the original session still has separate voice and music tracks, muting or lowering the music track gives you far more control than extracting speech from a finished mix. Extraction is the fallback for when that clean source no longer exists.
Clearing the music does not clear the rights
Stripping music out of a file does not grant permission to use the recording or what is in it. YouTube states that creators generally need the rights to copyrighted material in their videos, including music that is only audible in the background. Before you publish, confirm you have permission or swap in a track you are actually licensed to use. A clean export and a cleared license are two separate jobs, and skipping the second one is where takedowns come from.
Once the voice is isolated, you have a flexible master to build on. A clean track transcribes more accurately with Speech to Text, and if you plan to localize that voice into other languages, AI Dubbing can take the separated speech into 33 target languages.
Frequently asked questions
Can AI completely remove music while keeping the voice untouched?
Not reliably in every recording. Separation tools estimate which sounds belong to speech and which belong to music, so overlapping sounds, loud music, and reverberation can leave traces of music behind or subtly alter the voice.
How much does DubSmart Speech Separator cost?
Speech Separator is listed at 100 credits per minute, and the free tier currently includes 2,000 credits—about 20 minutes at that rate. Check our current pricing for available plans and terms before a larger job.
Which file formats can I upload?
Our Speech Separator page lists MP3, WAV, and AAC among supported audio formats, and video files are supported as well. Confirm any current size limits in the upload interface.
Can I remove a song from a video already on YouTube?
For eligible copyright claims, YouTube Studio provides options including erasing or replacing a song. Whether the edit sounds clean depends on the audio and the claim, so review YouTube's instructions before saving changes.
What if I need a transcript after cleaning the audio?
Use Speech to Text to transcribe the separated voice. A transcript is also a handy way to check whether separation damaged or obscured any words.