Getting a clean, well-timed voiceover onto a video is less about expensive gear and more about following a repeatable sequence: write a tight script, record clean audio, sync it in an editor, and export with the right loudness and encoding. When you want to add voiceover to video work at scale—especially across languages—the same four steps hold whether you record narration live in Premiere Pro, generate speech from text in a browser tool, or run an AI dubbing pass to re-voice the clip in another language.
The method you pick has real trade-offs in cost, speed, and control. Recording your own narration is flexible and personal; hiring a voice actor sounds professional but costs more; text-to-speech is the most cost-effective way to add voiceovers at scale, particularly when you need frequent updates or many language versions. This guide walks the full workflow, the tools that fit each situation, and the audio standards that keep your track sounding consistent across YouTube and podcast platforms.
On this page - The four-step voiceover workflow that works for any video - Choosing your method: record, generate, or dub - Recording clean narration in Audacity or your editor - Adding voiceovers in browser editors and desktop NLEs - Loudness, encoding, and export settings that hold up - Localizing your voiceover into other languages - A decision checklist before you hit record
The four-step voiceover workflow that works for any video
Strip away the specific tool and every voiceover job reduces to the same sequence. Synthesizing multiple tutorials and production guides, the reliable process runs like this: write and finalize a script segmented to match the video's structure; record clean audio in a quiet space with a correctly configured microphone; edit the recording to remove mistakes, trim silence, and apply basic processing before normalizing to a target loudness; import the audio onto a dedicated voiceover track and align it with the picture; balance levels between voiceover, music, and original camera audio; then export using recommended encoding and check playback across devices.
The script stage matters more than most creators expect. Segmenting your script into sections that map to on-screen moments prevents the classic problem of narration that runs long or short against the visuals. For instructional and e-learning content, planning subtitles, captions, and multilingual narration at the script stage—rather than bolting them on later—avoids costly rework when you localize the course for different regions.
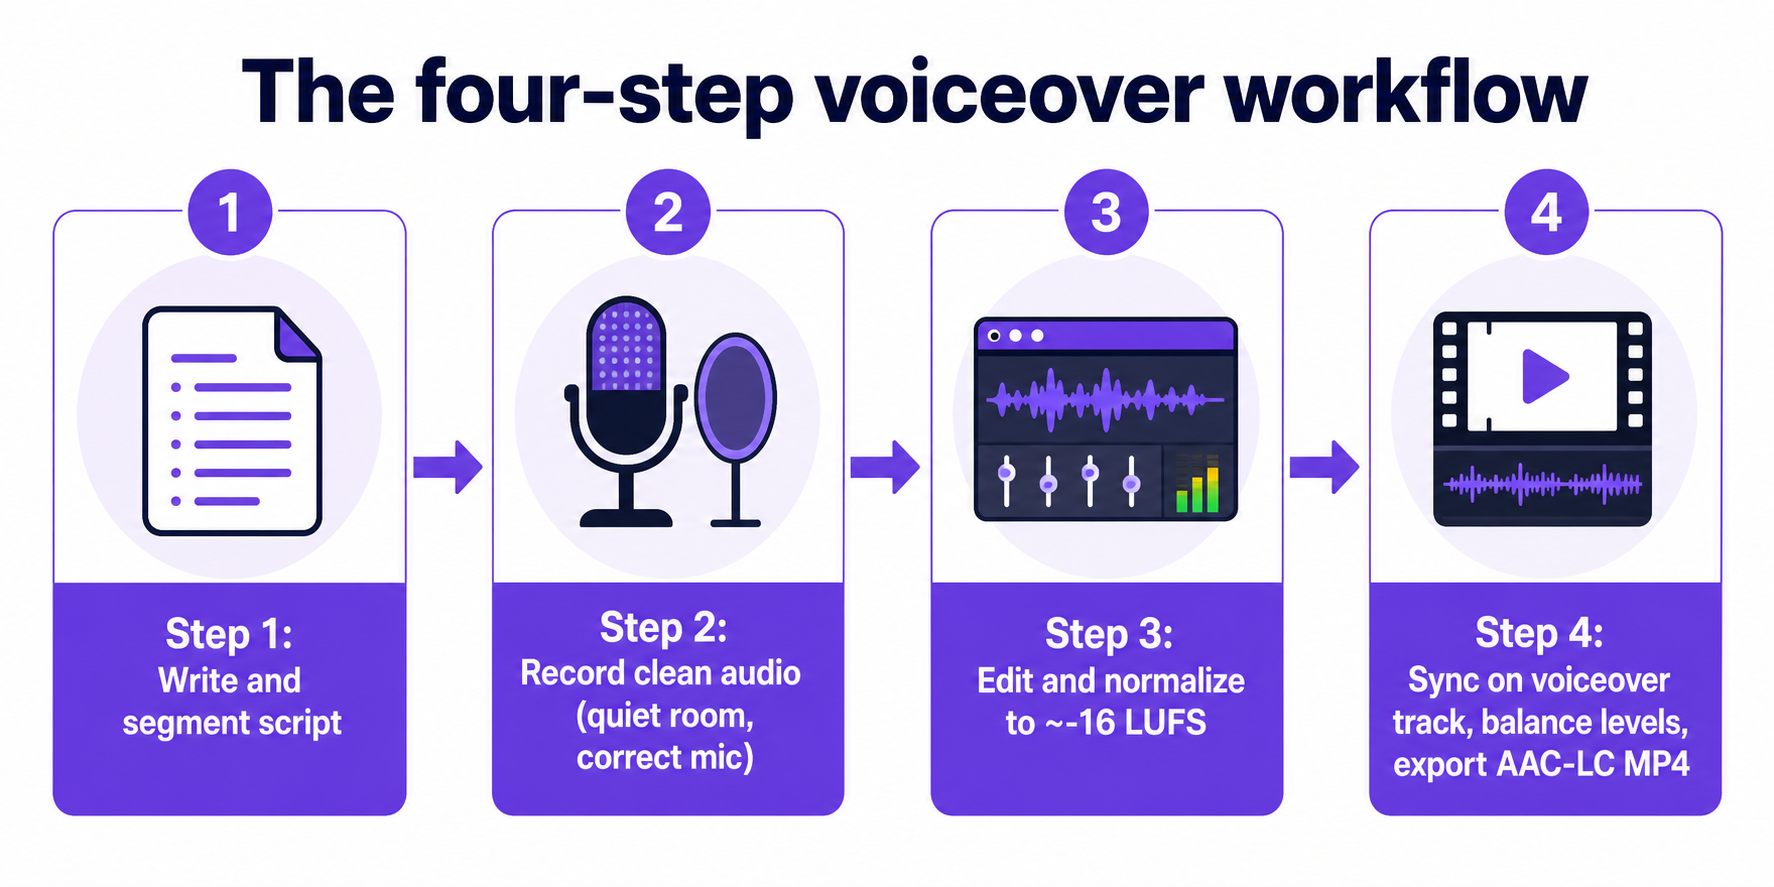
One detail that separates amateur from professional results is level balancing. When narration plays over background music, ducking the music underneath the speech keeps every word intelligible. Skip that step and even a well-recorded voice gets buried the moment the soundtrack swells.
Choosing your method: record, generate, or dub
There are three core methods to get a voiceover onto a video, and each suits a different production reality. You can record narration directly in a video editor while the picture plays, record or generate audio separately and then import and sync it on the timeline, or run an AI dubbing workflow that auto-transcribes and re-voices the video into another language, often with voice cloning and lip-sync adaptation.
For e-learning and course production specifically, the choice narrows to three narration sources with clear trade-offs.
| Method | Strengths | Trade-offs |
|---|---|---|
| Self-recorded narration | Flexible, personal, no per-project fee | Time-intensive, depends on your recording space and voice |
| Hired voice actor | Professional polish and delivery | Higher cost, slower turnaround for edits |
| Text-to-speech (TTS) | Cost-effective, scalable, fast updates | Delivery is synthetic; suits frequent changes and multilingual versions |
Text-to-speech is described across the guidance as the simplest and most cost-effective way to add voiceovers at scale, and it becomes especially compelling when a course needs many language versions or frequent content updates. If you expect to revise scripts often, regenerating a TTS line is far cheaper than re-booking a studio session. You can generate narration from a script directly with a Text to Speech engine offering a large voice library, which sidesteps the recording step entirely for many projects.
The honest caveat: claims about "natural voices," "perfect lip-sync," and "instant translation" come from marketing pages, and the gathered material contains limited independent, peer-reviewed research comparing the accuracy, listener preference, or long-term learning impact of AI-generated narration against human voice actors. Treat quality promises as claims to test on your own footage, not as settled fact.
Recording clean narration in Audacity or your editor
If you record your own voice, the single most common mistake is capturing audio on the wrong input. Audacity's official support documentation instructs users to select the intended microphone from the list of recording devices in the Audio Setup toolbar before recording. Confirm that setting every session—system defaults have a habit of reverting to a built-in laptop mic.
A voice-focused Audacity workflow runs in a concrete sequence: open the program, verify the correct mic under Preferences → Devices, set the recording channels to mono (narration rarely benefits from stereo capture), press the red Record button, speak the script, press Stop, then export the recording to a format such as MP3. Mono is the right default here because a single narrating voice carries no meaningful stereo information, and mono keeps file handling simpler downstream.
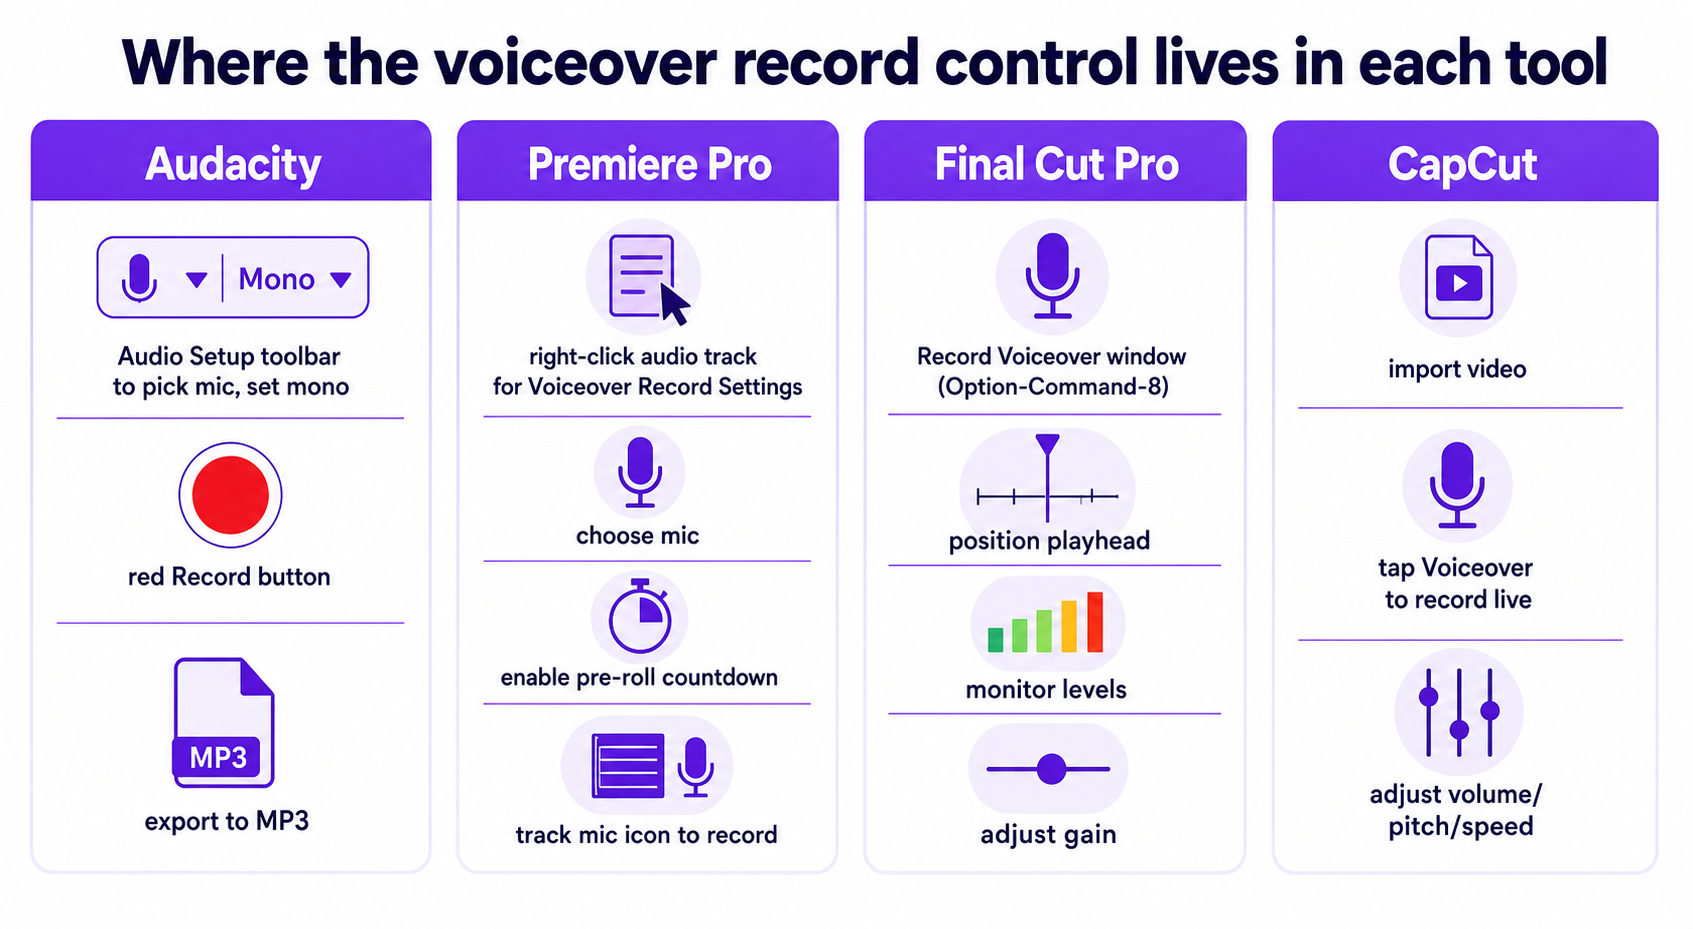
Recording live inside a video editor has one advantage over a standalone tool: you watch the picture as you speak, so pacing naturally follows the cut. In Adobe Premiere Pro, tutorials show users right-clicking an audio track to open Voiceover Record Settings, selecting the correct microphone, enabling a pre-roll countdown, and muting input during recording to prevent feedback, then clicking a track-level microphone icon to record straight to the timeline and stopping with the spacebar. Final Cut Pro uses a dedicated Record Voiceover window—reachable via a keyboard shortcut such as Option-Command-8—where you position the playhead at the start point, monitor level meters, set gain, and capture the clip directly beneath the playhead. CapCut lets you import a video, tap Voiceover to record narration in real time, then adjust volume, pitch, speed, and quality afterward, or upload a pre-recorded track instead.
Whichever you use, the pre-roll countdown and input monitoring aren't optional niceties. The countdown gives you a beat to breathe before speaking, and muting the input during capture stops the recorded track from feeding back through your speakers.
Adding voiceovers in browser editors and desktop NLEs
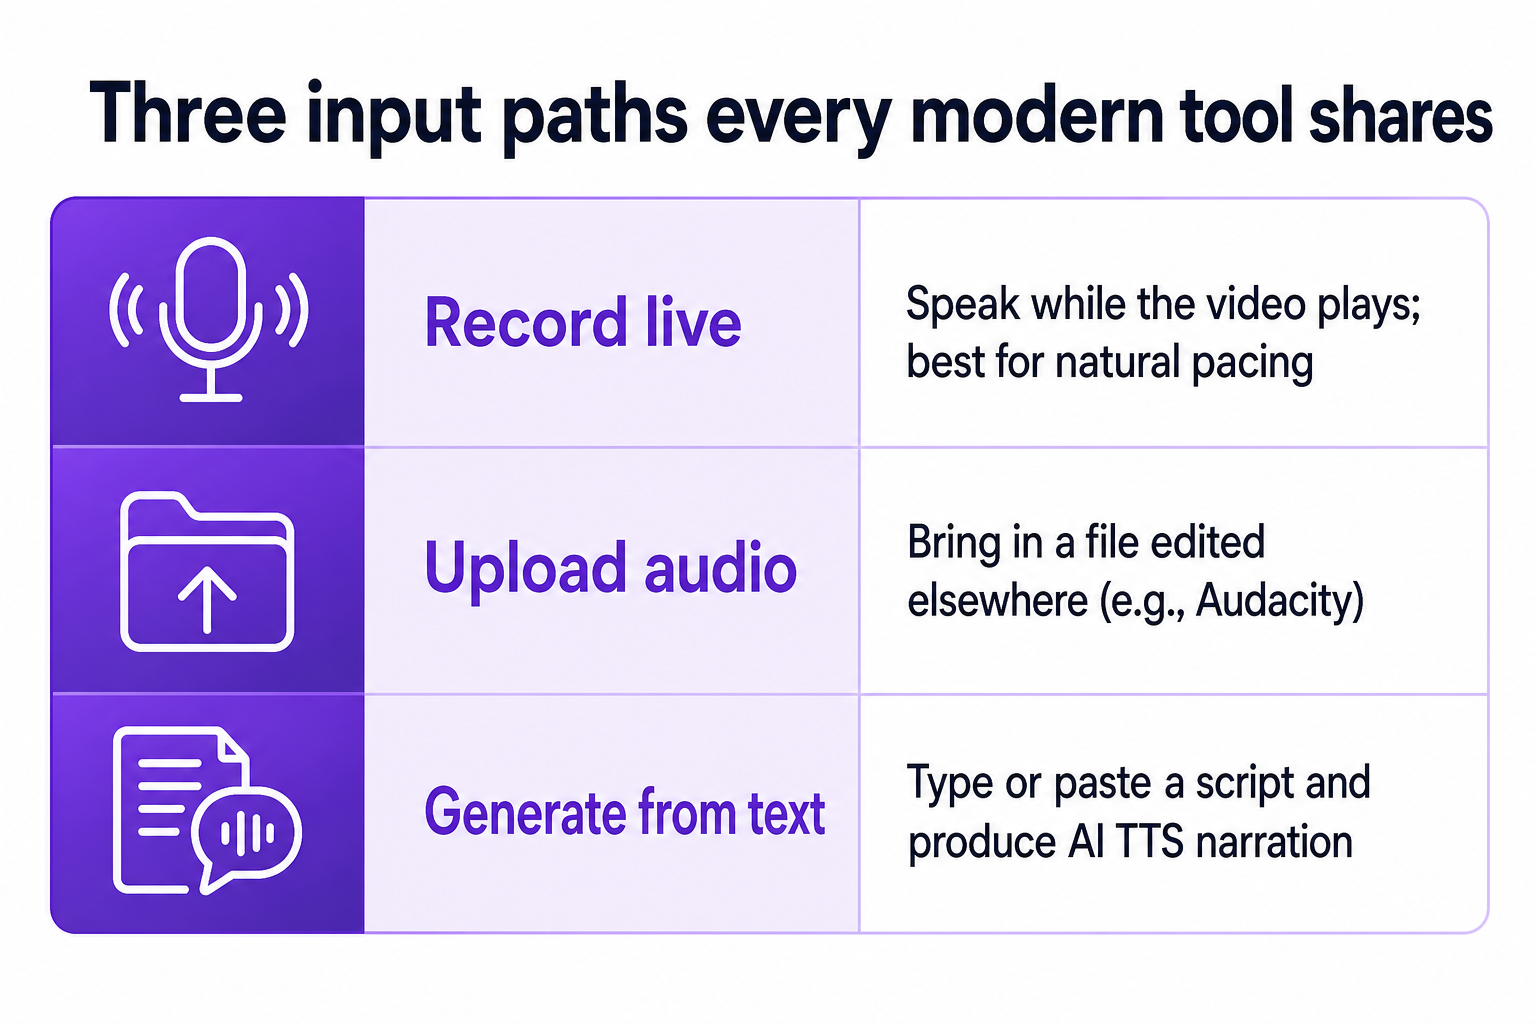
Browser-based editors have closed much of the gap with desktop software for straightforward voiceover work, and they handle surprisingly large files. Each of the major web tools supports the same three input paths—record, upload, or generate from text—but the details differ enough to matter.
| Tool | Input options | Notable spec |
|---|---|---|
| Clipchamp | AI text-to-speech, audio-only record, import audio, detach webcam audio | Four distinct ways to add a voiceover in one project |
| Animaker | Record, upload, or generate from text | Accepts video uploads up to 20 GB |
| EchoWave | Record, upload, or AI voice from text | Accepts MP4, MOV, WebM, MKV, AVI; exports MP4 |
| VEED | Record, upload audio, or AI TTS from script | Browser sync and download, or start from blank canvas |
Microsoft's Clipchamp lists four routes: AI text-to-speech, audio-only recording via "Record & create," importing an existing audio file, or recording webcam video and detaching its audio to reuse as a voiceover. That last option is a practical trick when your best take happened during a talking-head recording. EchoWave's flow is representative of the browser pattern: upload a video, record narration while watching it, upload an audio file, or generate an AI voice from typed text, then drag the voice track to align timing, balance it against the original audio, and export an MP4. VEED follows the same shape—add video, record or upload voiceover or generate via AI TTS, sync, and download.
Desktop non-linear editors still lead when you need precise timeline control and multi-track balancing. If your project involves layered music, sound effects, and narration that all need independent level automation, the dedicated voiceover-track model in Premiere Pro or Final Cut Pro gives you finer control than most browser tools. For quick single-narration clips or social content, the online editors are often faster from upload to export.
Loudness, encoding, and export settings that hold up
A voiceover that sounds fine in your editor can play back too quiet or jarringly loud once it hits a platform. Loudness normalization solves this. Industry practice around spoken-word content has largely standardized on an Integrated loudness of about -16 LUFS. Audio Audit recommends normalizing podcast audio to -16 LUFS using a loudness normalization effect in perceived-loudness mode, and describes a practical working range of -17 to -15 LUFS for consistent results across episodes and platforms.
That target has engineering backing: Resound.fm notes the Audio Engineering Society recommends spoken-word audio sit between -16 and -20 LUFS, which gives the commonly cited numbers their technical justification. Treat the exact figure as a starting point rather than a rule, though—these are de facto recommendations, not formally enforced standards, and different platforms recommend slightly different targets, with some streaming services closer to -14 LUFS. Normalize to around -16 LUFS as a sensible default for speech, then adjust if a specific destination publishes its own number.
Aim for roughly -16 LUFS integrated for speech, keep a working tolerance of -17 to -15, and confirm your target destination hasn't published a different figure before you finalize.
For YouTube specifically, the recommended upload settings use AAC-LC audio, in stereo, at a 48 kHz or 96 kHz sample rate, inside an MP4 container. For music-heavy source material, separate guidance points to 48 kHz, 24-bit lossless formats such as FLAC as an ideal master before the platform encodes. Frame-rate guidance is to encode and upload at the frame rate you originally recorded—commonly 24, 25, 30, 48, 50, or 60 fps. One realistic limitation: YouTube re-encodes uploaded audio and video, so even flawless adherence to these settings leaves final playback quality partly dependent on the platform's internal pipeline, and creators still report perceptual differences after following the recommendations.
Accessibility belongs in the export checklist too. Pairing narration with captions and downloadable transcripts supports viewers who are deaf, hard of hearing, or watching with sound off, and it aligns with the Web Content Accessibility Guidelines. Testing playback on smartphones, tablets, desktops, and with screen readers confirms the file behaves as intended before you publish.
Localizing your voiceover into other languages
Multilingual reach is where the voiceover workflow branches most sharply. Instead of re-recording narration for each market, an AI dubbing workflow can automatically detect a video's source language, generate a transcript, and re-voice the clip into another language—some tools also adapt mouth shapes to the new speech track. Canva defines AI dubbing as using artificial intelligence to translate and replace a video's original audio with a new language track while preserving the speaker's tone and flow as much as possible, and its feature lists broad language coverage including Japanese, Chinese, German, Hindi, French, Korean, Portuguese, Italian, Spanish, Arabic, and many more.
For creators expanding a channel across markets, this changes the economics of localization. Rather than commissioning separate voice talent per language, you can run the source video through an AI Dubbing pass and produce multiple language tracks from one master. When brand consistency across languages matters, Voice cloning lets a single recognizable voice carry through every localized version rather than swapping to a different narrator per market.
Developers and agencies building localization into their own products can bypass the editor UI entirely. An AI Dubbing API automates translation and dubbing into multiple languages programmatically, a Text to Speech API converts scripts to narration at scale, and a Voice Cloning API creates custom voices from audio samples for use in downstream synthesis. This is where the record-versus-generate decision from earlier compounds: at API scale, generated narration is the only method that keeps pace with high-volume, frequently updated multilingual output.
Keep expectations calibrated. Claims of "perfect lip-sync" and "natural voices" for AI dubbing come from pages, and the reviewed material offers no independent evaluation of listener preference or learning impact versus human dubbing. The practical approach is to test a representative clip in your actual target languages and judge the output against your own quality bar before committing an entire library.
A decision checklist before you hit record
Use this sequence to lock in your approach and avoid mid-project reversals.
- Define the deliverable. How many languages, how often will the script change, and where does it publish? Frequent updates or many languages tilt strongly toward TTS or AI dubbing; a single premium hero video may justify a hired voice actor.
- Pick a method that matches that reality. Record live in an editor for natural pacing on one-off clips, record separately in Audacity for maximum control over processing, or generate from text when volume and update speed dominate.
- Prepare the script. Segment it to match on-screen sections, and for instructional content design each video around a single concept with a clear structure—intro, body, and an explicit summary or call to action. Keep online learning videos short, often in the 3–5 minute range, to hold attention.
- Set up capture correctly. Confirm the right microphone is selected, record in mono for narration, use a quiet space, and enable a pre-roll countdown when your tool offers one.
- Edit and normalize. Remove mistakes, trim silence, apply light noise reduction and EQ, and normalize to roughly -16 LUFS for speech.
- Sync and balance. Place narration on a dedicated voiceover track, align it to picture with scrubbing and markers, and duck music beneath speech.
- Export and verify. Use AAC-LC stereo at 48 kHz in an MP4 for YouTube, add captions and a transcript, and check playback on multiple devices and a screen reader before publishing.
- Localize if needed. Run the finished master through an AI dubbing workflow for additional languages, using voice cloning where a consistent brand voice matters, and QA each language track on a sample before batch processing.
Working through these steps in order means the expensive decisions—script segmentation, method choice, and localization plan—happen before you record, not after you discover the narration won't scale. For creators building a static explainer from stills rather than footage, an Image to Video step can supply the visual base that your voiceover then narrates.