
Swapping the spoken language in a video used to mean re-recording talent, booking a studio, and stitching new audio to picture by hand. With DubSmart AI, learning how to change voice language in a video comes down to a single workflow: upload the file, pick a target language and voice, let the AI generate the dub, and download the localized result. Our AI Dubbing translates from 60+ source languages into 33 target languages, so one video can become a multilingual asset without switching tools. For most short clips of five to fifteen minutes, you can go from upload to download in well under an hour, previews and small edits included, using our credit-based plans that start with a free tier.
Table of contents
What you get, how long it takes, and rough cost
The outcome is a natural-sounding voice track in your chosen language, timed to your visuals, replacing or overlaying the original. The same workflow carries across YouTube videos, marketing clips, e-learning modules, and film content, so you are not rebuilding a process for every format.
Time scales with runtime and how much you fine-tune. A tidy five-to-fifteen-minute video usually clears the full loop, from upload through preview and download, in under an hour. Longer files and heavy multi-speaker editing add time mostly in the review stage, not the rendering.
Cost runs on credits rather than per-minute studio rates. Credits cover AI Dubbing and Text to Speech usage, and we offer a free tier, paid plans, and enterprise options. As a rough map of credits to runtime, one tier lists 2,000 credits as enough for about two minutes of AI Dubbing and Text to Speech audio, which gives you a sense of how to budget a longer project.
Prerequisites: your pre-flight checklist
A few minutes of prep prevents most rework later. Work through this before you open the tool:
- Confirm content rights. Make sure you have the legal right to translate, dub, and redistribute the video, including music, voice performances, and any licensed material.
- Prepare a clean source video. Clear speech that is not buried under music or noise gives the AI better transcription and more natural timing.
- Decide your language pair. Identify the source language (say, English) and the target language you want in the new voice track (Spanish, Portuguese, Hindi, and so on). With 60+ source languages and 33 targets, most popular pairs are covered.
- Set up your account and credits. Sign in and confirm you have enough credits for the length you plan to dub.
- Have the file ready. You can paste a YouTube link or upload an audio or video file directly from your device.
- Optional: prepare a voice sample. If you want to keep your own or a host's voice across languages, capture 20 to 60 seconds of clean speech with minimal background noise in a supported format such as MP3, WAV, AAC, M4A, or FLAC.
If you are unsure whether your source audio is clean enough, our Speech to Text tool is a quick way to sanity-check how well the original track transcribes before you commit credits to a full dub.
Step-by-step: changing the voice language
The workflow below covers a standard single-language change from upload to publish.
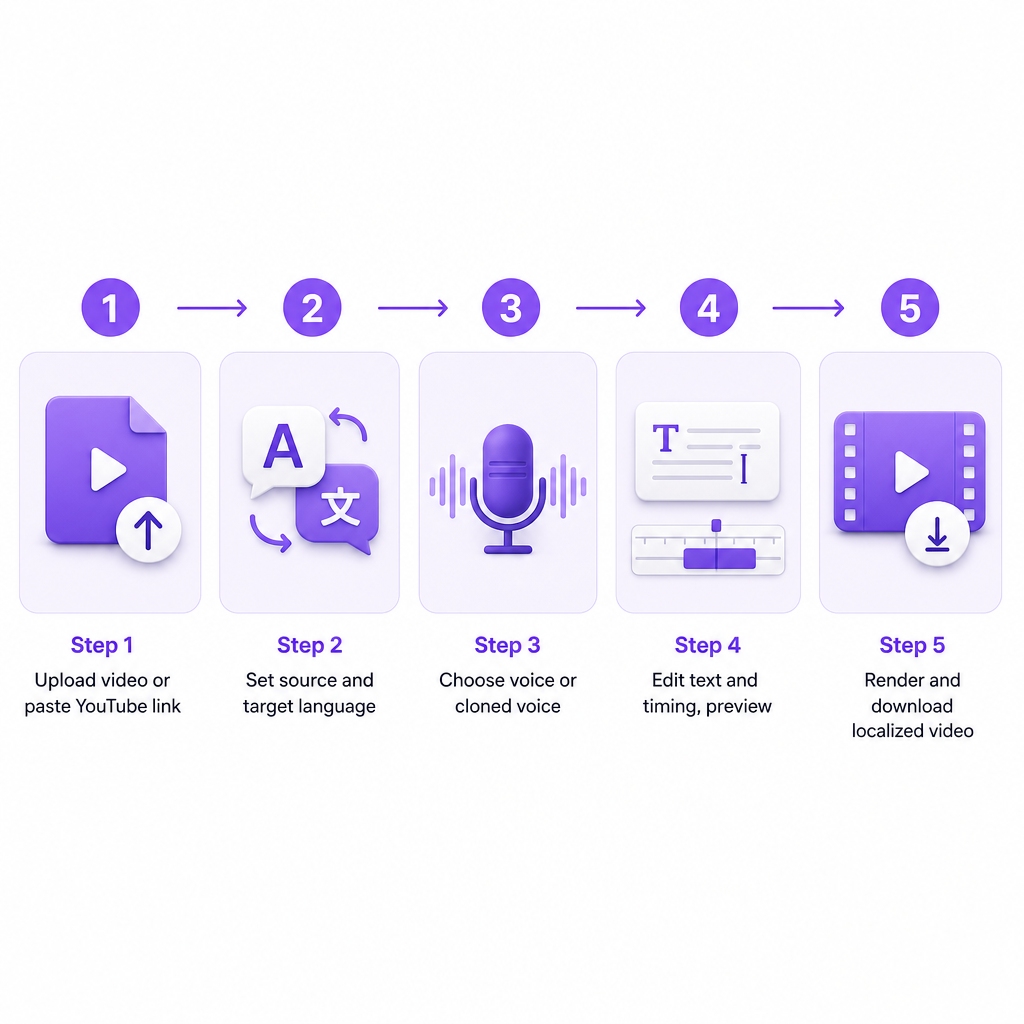
- Open AI Dubbing. Sign in, then from the dashboard select AI Dubbing. Our unified interface lets you pick one tool at a time, and the AI Dubbing workspace is built specifically for translating and dubbing videos into multiple languages.
- Upload your source or paste a link. Paste a YouTube URL if the content lives there, or upload an audio or video file from your device. Longer files take longer to ingest while the pipeline prepares the content for transcription.
- Set source and target languages. Confirm the detected source language, then choose the target voice language you want to hear in the final track, such as English to Spanish or Hindi to English. Pick the pair that matches your audience.
- Choose a voice and style. Select a voice from our library of natural-sounding AI voices, and where options exist, adjust gender, tone, and style: professional for corporate training, friendly for YouTube, neutral for e-learning. If you have a cloned voice, select it here.
- Configure speakers, text, and timing. For interviews or multi-host videos, add speakers and assign voices to each. Review the transcribed and translated text for accuracy, correct names and terminology, then adjust segment timings so lines fit scene cuts and on-screen text.
- Preview the dub. Generate a preview and listen to the parts that matter most: the intro, calls to action, and any emotional scenes. If a line feels rushed, flat, or slightly out of sync, return to the text and timing editor, adjust, and regenerate.
- Render and download. When the preview holds up, render the full project. The AI converts translated text into speech and produces the complete voice track synced to your visuals. Choose your output, audio-only or fully mixed video, then download and store it.
- Verify and publish. Do a final pass on language accuracy, especially technical terms and brand names, confirm the tone matches the purpose, and check that audio levels are consistent and not clipping before uploading to your platforms.
If you want the mechanics behind how translated audio is generated and matched to the original delivery, our explainer on speech-to-speech dubbing breaks down what happens between upload and render.
Keep your own voice in every language
Changing the language does not have to mean changing the speaker. With Voice cloning, you can preserve a host, instructor, or brand voice across every target language.
Start by recording a clean sample of 20 to 60 seconds for the person you want to clone, avoiding music, overlapping speakers, echo, and background noise, and save it in a supported format like MP3, WAV, AAC, M4A, or FLAC. Upload that audio to create a named custom voice profile, which then becomes available across both Text to Speech and AI Dubbing projects. In your dubbing project, simply select that cloned voice as the dubbing voice for the target language.
This is especially useful for YouTube channels, e-learning series, and branded content where the voice is part of the brand and you want the same identity from region to region. Teams that want to automate this at scale can wire it into their own apps with our Voice Cloning API.
Common mistakes and troubleshooting
| Problem | Why it happens | What to do |
|---|---|---|
| Transcription errors, odd pacing | Loud music, overlapping speakers, or heavy noise in the source | Use a cleaner audio version, or separate speech from background before dubbing |
| Translation feels off or skips parts | Mixed languages in one track confuse automatic detection | Set the correct source language manually and dub language segments separately |
| Voice out of sync with picture | Translated lines change length; some languages need more words | Adjust segment timing and pauses, and tighten long lines to fit the rhythm |
| Tone does not match the content | The chosen voice or style suits a different purpose | Try other voices until the emotional tone fits, then reuse a cloned voice for consistency |
| Inconsistent terms or brand names | General translation misses domain-specific vocabulary | Edit key terms in the text segments and keep a simple glossary across videos |
When background audio is the root cause, cleaning the track first pays off. Our Speech Separator isolates spoken dialogue from music and noise, giving the dubbing engine a clearer signal to work from.
Do it yourself or hand it off
For most YouTube channels, marketing campaigns, and internal training, the DIY route with AI Dubbing and Voice Cloning is fast, repeatable, and cost-effective. Our integrated toolset and automated workflow are built for individual creators, small businesses, and lean teams to run localization themselves.
Some projects justify more hands-on support. Consider professional help when you have long-form episodic content where lip-sync and performance direction are critical, high-stakes corporate or regulated training in fields like healthcare or finance that needs legal review and strict terminology control, or multi-language releases where you must coordinate subtitles, dubbing, accessibility tracks, and region-specific requirements.
A practical rule of thumb: if you publish fewer than a dozen videos a quarter and distribute mainly online, the DIY tools are typically enough. If you are planning a multi-language rollout of a show, a feature film, or a regulated training curriculum, it is worth adding casting, direction, and dedicated QA to the process. If you are building an entire localized channel rather than a single clip, our guide to making a multilingual YouTube channel maps out the wider strategy.
Frequently asked questions
Which languages can I change my video's voice into?
AI Dubbing lets you dub videos from 60+ source languages into 33 target languages, covering the major global languages creators and businesses rely on.
Can I use DubSmart for YouTube videos specifically?
Yes. You can paste a YouTube link directly or upload video files from your device into the AI Dubbing tool, which suits creators expanding into multilingual audiences.
Can I keep my own voice in other languages?
Yes. Voice Cloning creates a custom AI voice from a short, clean sample, and you can reuse that voice in Text to Speech and AI Dubbing so your voice identity stays consistent across languages.
What if my video has multiple speakers?
In the AI Dubbing editor you can add speakers, assign different voices, and edit segment timing and text, which handles interviews and panel discussions.
How are costs calculated for changing voice language?
Costs run on credits consumed by AI Dubbing and Text to Speech. As a reference, one tier lists 2,000 credits as enough for about two minutes of audio, with a free tier and enterprise plans available for different usage levels.