You can turn a written script into a polished TikTok voiceover in minutes: write your hook, pick a voice or clone your own, generate the audio in seconds, then drop it into the TikTok editor. With our credit-based pricing, a free tier, and unlimited voice cloning on paid plans, most creators can test several voice styles per video without watching the cost climb. A TikTok voice generator built for short-form gives you control the in-app voice list can't match.
This is a doing guide, not a definitions guide. We'll walk through prerequisites, the exact production sequence in DubSmart AI, the mistakes that quietly ruin a clip, and the point where a solo creator's workflow becomes an agency-scale rollout that our team should carry.
Table of contents
- What you need before you start
- Generate your TikTok voiceover step by step
- Go multilingual: dub one TikTok into many markets
- Common mistakes and quick fixes
- What you can do alone, and where we take over
- Frequently asked questions
What you need before you start
Gathering these first keeps the whole session under a few minutes rather than a stop-start scramble.
- A DubSmart AI account with credits available, or a free-tier allowance to test Text to Speech and dubbing.
- A vertical video file or a clear plan for the clip, ideally under 60 seconds.
- A written script for the narration in your source language, focused on a strong hook and a clean payoff.
- At least 20 seconds of clean, quiet spoken audio if you want a custom cloned voice instead of a library voice.
- A language decision: original language only, or multilingual versions produced with AI Dubbing.
- Basic creative choices ready: voice gender, tone (playful, calm, authoritative), and rough speed and pitch preferences.
The cloning minimum matters more than people expect. Twenty seconds is the floor for clean speech, and audio recorded in a noisy room is the single biggest reason a clone comes back sounding off.
Generate your TikTok voiceover step by step
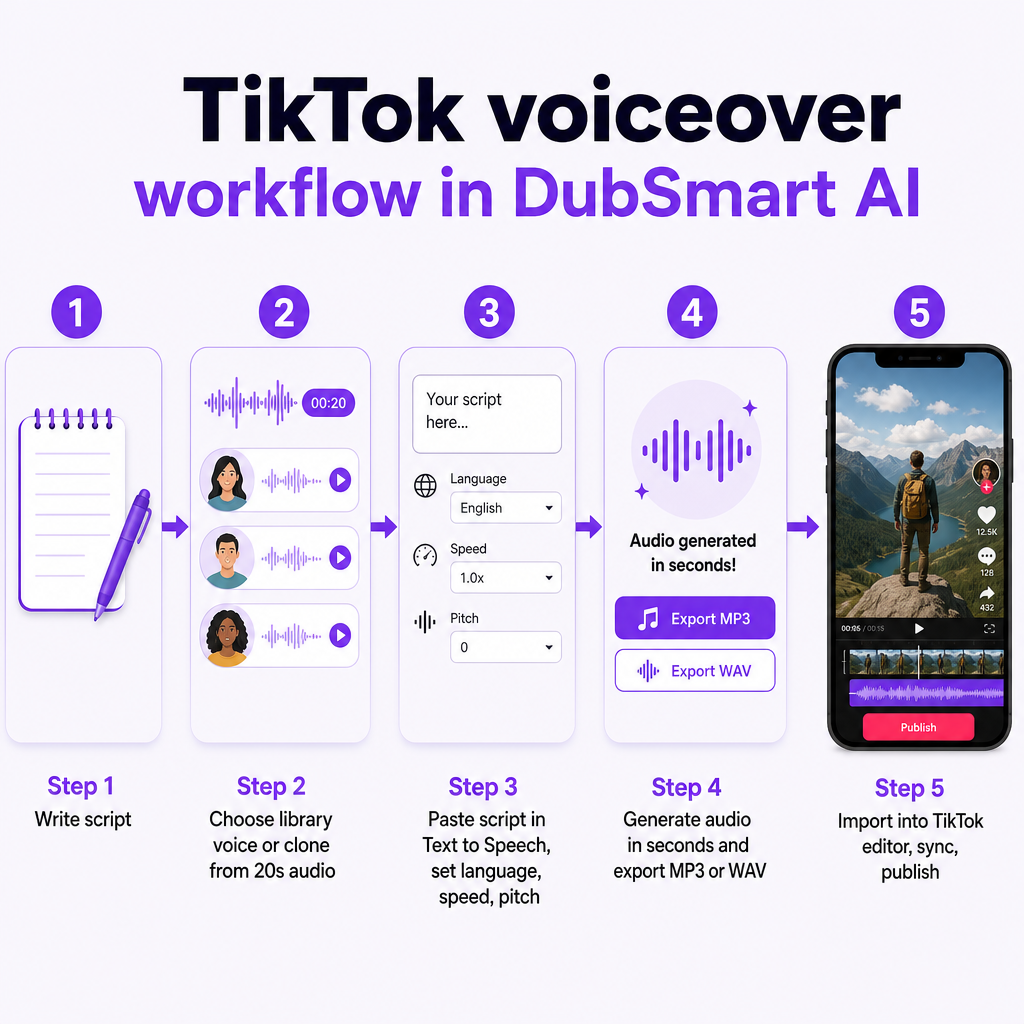
This is the core single-language flow. Every step below is one action in our platform.
- Write or tighten your script. Keep the opening line a genuine hook and the ending a clear payoff. Short-form voiceover rewards clarity over cleverness, so trim anything that delays the point.
- Choose your voice type. Pick from our library of 300+ natural-sounding voices, or clone your own. To clone, record at least 20 seconds of clean speech, upload it in the Voice Clone section, and let the system process it until the new voice appears as a selectable option inside Text to Speech and AI Dubbing.
- Open Text to Speech and paste the script. Select your language and the voice you want (library or cloned), then adjust speed and pitch to match the mood. Pace is a creative lever, not a default to ignore.
- Generate the audio. Our first-party workflow produces speech in seconds, which is what makes it practical to render two or three voice styles for the same script and pick the strongest one.
- Export the audio file. Download in a TikTok-compatible format such as MP3 or WAV.
- Import into TikTok and sync. Bring the audio into the TikTok editor, align it with your footage, and publish. We assume a manual export-and-upload flow rather than a direct publish integration.
Because generation is near-instant and cloning is unlimited on paid plans, iterating on tone is essentially free once you're on a plan. That's the practical advantage over the fixed in-app voice list: you audition voices instead of settling for one.
Go multilingual: dub one TikTok into many markets
If you're expanding a channel across regions, you don't re-record anything. Our voice cloning can carry a single brand voice across languages where permitted, so a Spanish and a German cut still sound like you.
- Upload the original video into an AI Dubbing project.
- Set the source language and one or more target languages. We support dubbing from 60+ source languages into 33 target languages, and coverage continues to expand.
- Choose a library voice or your cloned voice; we can carry that cloned voice into other languages where rights allow.
- Let the system translate, dub, and generate subtitles, then export a localized version for each target TikTok account or campaign.
Subtitles aren't a nice-to-have here. Generating them alongside the dub keeps clips watchable with sound off, which is how most feeds are scrolled.
Common mistakes and quick fixes
These are the failure points we see most often, and the direct fix for each.
- Noisy or too-short cloning audio. Uploading under 20 seconds or recording with background noise produces a weaker clone. Fix: record in a quiet space and give the system clean, continuous speech.
- Wrong language settings. Choosing the wrong source language in dubbing, or narrating in a language that doesn't fit the audience, produces awkward, low-engagement results. Fix: confirm both source and target languages before you generate.
- Flat pacing. Leaving speed and pitch at default can make narration sound rushed or lifeless. Fix: use the speed and pitch controls deliberately to match the clip's energy.
- Voice drift across posts. Switching between many unrelated stock voices weakens channel identity. Fix: commit to one cloned or library voice as your signature and reuse it.
- Skipping subtitles. No captions means lower accessibility and less watch time on muted feeds. Fix: generate subtitles as part of the dubbing or from Speech to Text.
What you can do alone, and where we take over
Most of this guide is genuinely DIY, and it should stay that way for a solo creator. Writing the script, cloning your own voice from a short clip, generating one-off voiceovers, and exporting for a single account are all things you can handle in an afternoon with a free or entry plan.
The work changes character at scale. When you're localizing a back catalog into a dozen languages, keeping one brand voice consistent across accounts, or coordinating recurring campaigns, the effort is no longer a single export. That's where our enterprise plans and our team fit: bulk dubbing, multilingual rollout strategy, and consistent voice management across a content library.
It also changes for developers and agencies. If you need voiceover generation inside your own product or a repeatable pipeline, our Voice Cloning API turns the manual steps into calls: upload audio to get a file key, create a named custom voice from that key, then reference the voice in Text to Speech or AI Dubbing routes. A one-off creator doesn't need this; a team shipping localized content weekly does.
One boundary to respect regardless of scale: cloning a voice requires the right to use it, and platform content rules apply to what you publish. Check TikTok's current community guidelines and get legal advice when you're unsure about rights or consent.
Tell us your language targets, video count, and posting cadence, and we'll recommend the right plan or build a tailored rollout for you.
Frequently asked questions
How do I clone my voice for TikTok in DubSmart?
Record at least 20 seconds of clean speech, upload it in the Voice Clone section, and wait for processing. The cloned voice then appears as a selectable option in Text to Speech and AI Dubbing.
Can I dub my TikToks into other languages?
Yes. Upload the video to an AI Dubbing project, set your source and target languages, and export localized versions. We support dubbing from 60+ source languages into 33 target languages.
Do I have to pay extra for multiple voice clones?
No. Voice cloning is unlimited on paid plans with no extra per-clone cost, so you can create and test several voices within your plan.
How do I get my voiceover onto TikTok?
We use a manual flow: generate and export your audio or dubbed video from our platform, then import it into the TikTok editor and publish from the app.
How fast is the voiceover generation?
Text to Speech generation completes in seconds, which is why it's practical to render several voice styles for one script before choosing the best take.